Installing a New Queen - Introduction Methods


Successfully introducing a new queen is critical for colony survival and productivity. Here are proven methods that work well with Primal Bee hives' thermal efficiency and design features.
When You Need a New Queen
Common Requeening Situations
Planned requeening:
- Queen aging: Replace queens over 3 years old (most lose ability to lay after this period)
- Poor performance: Low egg laying or spotty brood patterns
- Genetic improvement: Upgrade to better stock (disease resistance, gentleness)
- Seasonal replacement: Proactive replacement before problems develop
Emergency requeening:
- Queen loss: Dead or missing queen discovered during inspection
- Failed mating: Virgin queen failed to mate properly
- Supersedure failure: Colony attempted queen replacement but failed
- Disease issues: Queen showing signs of disease or poor health
Colony management:
- After splits: Installing queens in split colonies for faster production
- Package installations: Replacing package queens with local stock
- Swarm management: Requeening to reduce swarming tendency
- Combining colonies: New queen needed after combining queenless units
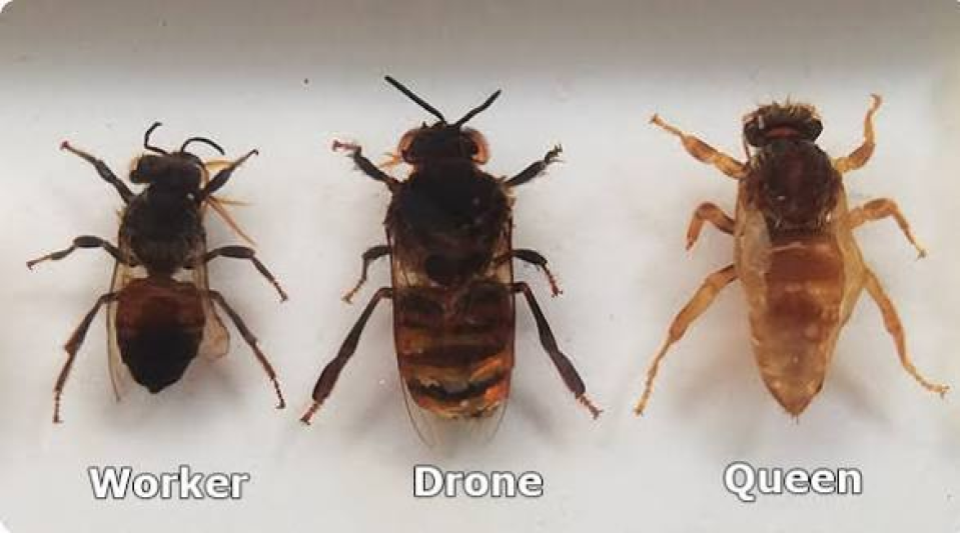
How to Find the Queen
Before you can assess whether you need a new queen, you need to find the current one—or confirm she's missing.
Physical characteristics:
- Longer, more tapered abdomen than worker bees
- Often bending her abdomen into cells to lay eggs
- Usually followed by 5-10 attendant bees (her retinue)
- Moves differently than workers—more deliberate, less frantic
Where to look:
- Start where brood is happening—she's likely close by
- Check frames with eggs and young larvae first—she was there recently
- Look for a cleared space—workers often give her room to move
- Watch for the retinue pattern—a cluster of bees facing inward toward one spot
Tips for finding her:
- Work systematically through frames rather than randomly searching
- Move slowly—quick movements make her hide
- Look for the pattern, not just the queen—the attendant bees are often easier to spot than she is
- Mark her (queen marking paint is safe) once found to make future searches easier; sometimes, breeders do this as well on your behalf!
If you can't find the queen: Look for evidence instead. Fresh eggs (standing upright in cells) mean she was there within the last 3 days. Young larvae mean she was there within the last week. A solid brood pattern indicates a healthy, active queen even if you don't see her directly.
Types of Queens and Sources
Queen Options
Commercially raised queens:
- Advantages: Available quickly, known genetics, professionally mated
- Considerations: May need time to adapt to local conditions
- Quality varies: Choose reputable breeders with good track records
- Seasonal availability: Order in advance during peak season
- Can be selected for different traits: gentleness, hygienic behavior, productivity, disease resistance
Common queen types and their characteristics:
- Carniolan: Cold-hardy, good for northern climates
- Italian: Known for high productivity and gentleness
- Buckfast: A hybrid known for being strong and resistant, with high productivity in spring
- Caucasian: Very gentle and productive, with the longest tongues among honeybees (good for deep flowers)
Local queens:
- Advantages: Adapted to local conditions, shorter transport stress
- Sources: Local queen breeders, beekeeping associations
- Timing: May have limited availability
- Cost: Often more expensive but may perform better locally
Queen cells:
- Advanced technique: Installing developing queen cells instead of mated queens
- Timing critical: Must install at proper development stage
- Risk factors: Higher failure rate than mated queens
- Cost effective: Less expensive than mated queens
- Important note: Virgin queens need time to mate after emerging. If you install more than one queen cell, the first to emerge will make a squeaking "piping" sound—essentially playing Marco Polo to locate and kill other piping queens still in their cells.
Queen Quality Assessment
Signs of quality queens:
- Active movement: Queen should be alert and moving normally
- Attendant bees: 5-8 worker bees accompanying queen in cage
- Physical condition: Queen should be large, well-formed, undamaged
- Age appropriate: Young queens preferred for long-term performance
Red flags to avoid:
- Sluggish movement: Queen barely moving or appearing weak
- Dead attendants: Multiple dead bees in queen cage
- Physical damage: Missing legs, damaged wings, or other injuries
- Poor packaging: Damaged cage or inadequate food/water
If you receive a queen with problems: Many reputable breeders will replace queens free of charge if they arrive dead, damaged, or in poor condition. Contact the breeder immediately with photos—don't just accept a bad queen.
Queen Introduction Methods
Slow Release Method (Recommended for Beginners)
How it works:
- Queen remains caged while colony gradually accepts her pheromones
- Workers eat through candy plug to release queen
- Takes 2-4 days for complete acceptance (sometimes up to 7 days)
- Lowest risk method for valuable queens
Why it works: When workers first encounter a new queen, they treat her as a foreign invader. They may be aggressive—trying to sting the cage, biting at the screen, pulling at it. But by the time they've eaten through the candy plug (3-4 days), they've become acclimated to her pheromones and accept her as their queen.
Step-by-step process:
- Prepare colony: Confirm queenless status 24+ hours before introduction
- Check candy plug: Ensure candy is firm but not too hard
- Position cage: Place between frames where cluster can access—either on top of frames or suspended vertically between two frames opened slightly in a V-shape
- Candy side down: Orient cage so workers can reach candy easily. If positioning vertically, candy end faces downward.
- Optional: Remove the worker bees that came with the queen in the cage—this can prevent aggressive reactions between old bees and the queen's attendants
- Reduce disturbance: Minimal hive manipulation during introduction period
Critical follow-up:
After 2 days, check that the queen has been released. Look to see if the candy plug has been eaten through and the cage is empty.
If she hasn't been released after 2-3 days: You'll need to manually release her. Gently remove the remaining candy plug and watch to make sure the queen walks out and moves down between the frames. Don't just dump her—make sure she's safely positioned.
Why manual release may be needed: Sometimes the candy gets too hard, or workers don't fully eat through it. You want to ensure queens make it out of the candy plug, so be prepared to help if needed.
Verify acceptance: Check for new eggs 10-15 days after introduction. New bees should start emerging around day 22.
Requeening Timeline
Different requeening methods have different timelines. Here's what to expect:
|
Method |
First Inspection |
New Bees Emerging |
|
Inserting mated queen |
Day 10-15 |
Day 22 |
|
Planting queen cells |
Day 30-38 |
Day 39-46 |
|
Planting eggs/frame with eggs |
Day 39-47 |
Day 48-55 |
|
Natural requeening |
Day 39-47 |
Day 48-55 |
Primal Bee advantage: In a Primal Bee hive, new queens emerge faster than in standard hives—typically 16 days instead of 19 days—due to the stable incubation temperatures.
Critical rule: While waiting for the queen to emerge and mate, do not open the hive at all. Opening the hive can interfere with the mating process.
Requeening Success Factors
Colony condition affects success probability:
|
Colony State |
Success Probability |
|
Populated, healthy colony |
High |
|
Small but healthy colony |
High |
|
Small and disorganized colony |
Very low to none |
|
Colony after full decline |
Very low to none |
What this means: A weak, disorganized colony may not have the resources to successfully accept and support a new queen. In severe cases, combining with a stronger colony may be better than attempting to requeen.
Other factors affecting success:
- Varroa and Nosema levels: Infested colonies have lower probability of successful requeening
- Climate: Continuous rain can delay mating; sudden storms can harm the queen on her mating flight
- Season: Late-season requeening is riskier due to fewer drones available for mating
Alternative Introduction Methods
Direct Release (Higher Risk)
Only for experienced beekeepers or emergency situations:
- Remove cork/plug and release queen directly onto frames
- Higher rejection risk
- May work if colony has been queenless for extended period (very eager for any queen)
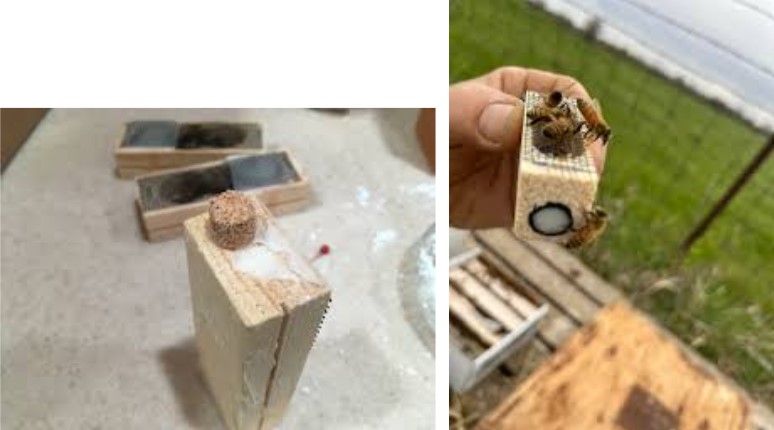
Push-in Cage Method
For valuable queens or difficult introductions:
- Queen is caged directly on comb using a screen cage pushed into wax
- Workers can interact through screen but can't harm queen
- Release after 3-5 days of acceptance behavior
- More labor intensive but highest success rate
Installing Queen Cells
For those raising their own queens or purchasing cells:
- Create a V-shape between two frames in the queenless colony
- Gently attach the queen cell to a thin wooden beam using wax, positioned vertically with the cap facing down
- Place the beam on top of the frames where they nearly meet, so the cell hangs in the gap
- Close the hive and don't disturb until inspection timeline
Primal Bee Specific Considerations
Thermal Advantages
The stable temperatures in Primal Bee hives provide:
- Better queen acceptance rates due to reduced colony stress
- Faster queen development from cells (16 days vs 19 days)
- More consistent results across seasons
Cage Positioning
- Place queen cage on top of nest frames or suspended between frames
- The thermal efficiency means temperature is consistent throughout the nest area
- Position where the cluster is concentrated for best access
Post-Introduction Care
- Avoid unnecessary inspections during acceptance period
- Maintain feeding if natural forage is limited
- First inspection should be brief—just confirm queen release and look for eggs
Troubleshooting Queen Introduction
Signs of Rejection
- Bees balling (clustering tightly) on queen after release
- Queen found dead shortly after release
- No eggs 2+ weeks after confirmed release
- Continued aggressive behavior toward cage area
If Introduction Fails
- Wait 24-48 hours before trying again
- Ensure colony is truly queenless (no virgin queens hiding)
- Consider using a different introduction method
- Very defensive colonies may need to be queenless longer before accepting
Special Situations
Laying workers: If a colony has been queenless long enough to develop laying workers, queen introduction is very difficult. The colony often rejects introduced queens. Options include combining with a queenright colony or shaking bees out and starting fresh.
Very small colonies: May lack the population to properly care for a new queen. Consider combining with another weak colony first.
The Bottom Line
Queen introduction requires patience and attention to timing. The slow release method works well for most situations, especially for beginners. Primal Bee's thermal stability improves acceptance rates, but the fundamentals remain the same: confirm queenlessness, introduce gradually, minimize disturbance, and verify acceptance through egg presence.
When in doubt, wait longer rather than rushing. A few extra days in the cage is better than a rejected queen.
Questions about queen introduction? Primal Bee holds regular office hours where you can get specific guidance for your situation.
On this Page
- When You Need a New Queen
- How to Find the Queen
- Types of Queens and Sources
- Queen Options
- Queen Quality Assessment
- Signs of quality queens:
- Red flags to avoid:
- Queen Introduction Methods
- Slow Release Method (Recommended for Beginners)
- Requeening Timeline
- Requeening Success Factors
- Alternative Introduction Methods
- Direct Release (Higher Risk)
- Push-in Cage Method
- Installing Queen Cells
- Primal Bee Specific Considerations
- Thermal Advantages
- Cage Positioning
- Post-Introduction Care
- Troubleshooting Queen Introduction
- Signs of Rejection
- If Introduction Fails
- Special Situations
- The Bottom Line


