Varroa Management - Thresholds, When & How to Treat


Varroa mites are part of modern beekeeping. Every colony gets them. What determines long-term success isn’t avoidance — it’s monitoring early, treating at the right time, and confirming that treatments worked.
Primal Bee hives make this process easier. The screened bottom board and removable varroa tray allow you to monitor mite pressure with minimal disruption, while the hive’s thermal stability supports more consistent treatment performance. What hasn’t changed is the beekeeper’s role: paying attention to trends and intervening before problems compound.
This guide explains how to monitor varroa levels, how to interpret thresholds, and how to treat effectively using methods compatible with Primal Bee hives. The goal isn’t perfection — it’s keeping mite pressure low enough for colonies to raise healthy bees and overwinter successfully.
Understanding Varroa Mites
What Varroa Mites Are


- Small reddish-brown external parasites (about the size of a pinhead)
- Live on adult bees and reproduce inside capped brood cells
- Feed on bees and weaken immune systems
- Vector multiple viruses that shorten bee lifespan
Why Varroa Are Dangerous
- Infested bees emerge weaker and less resilient
- Virus transmission accelerates colony decline
- Foraging efficiency drops as populations weaken
- Without management, mite pressure builds over time and colonies typically fail within a few seasons
Varroa management is routine maintenance, not an emergency-only response.
Using the Primal Bee Varroa Tray for Monitoring
Every Primal Bee hive includes a removable varroa tray designed for natural mite drop monitoring.

Setting Up the Tray
- Slide the varroa tray fully into the bottom slot beneath the screened board.
- Ensure the tray sits flat and covers the entire bottom area.
- Lightly coat the tray with cooking oil or petroleum jelly.
- This prevents mites from crawling away.
- Use a thin coating only.
Leave the tray in place only during monitoring periods. Do not leave it installed continuously, as this reduces airflow.
How to Count Mites (24-Hour Natural Drop)
The 24-hour natural mite drop is a consistent, low-disturbance monitoring method.
Day 1
- Insert a clean, prepared tray in the evening.
- Record the date and time.
Day 2
- Remove the tray exactly 24 hours later.
- Count all mites on the tray.
- Mites appear as reddish-brown, oval shapes approximately 1–2 mm long.
- Use a magnifying glass if needed.
- Record the total count.
Interpreting Daily Drop Counts
These thresholds are decision guides, not hard cutoffs.
- 0–3 mites/day: Low level — continue routine monitoring
- 4–9 mites/day: Moderate — increase monitoring frequency; prepare to treat
- 10+ mites/day: High — treatment recommended
- 20+ mites/day: Critical — immediate intervention required
Interpreting Counts in Context
Mite counts indicate trend and pressure, not a precise risk threshold. A colony with strong brood, good nutrition, and low stress may tolerate higher counts temporarily, while a stressed or weak colony may decline at lower levels. Always interpret counts alongside colony strength, brood quality, and seasonal timing.
Treatment Thresholds and Timing
When to Treat Based on Season
Spring (March–May)
- Treat if daily drop exceeds ~5 mites
- Lower thresholds apply because mite populations grow rapidly alongside brood
Summer (June–August)
- Treat if daily drop exceeds ~10 mites
- Avoid treatments during active honey flows
Fall (September–November)
- Treat if daily drop exceeds ~3–5 mites
- Most critical treatment period
Winter (December–February)
- Generally avoid treatments
- Emergency intervention only if infestation is severe
Best Treatment Windows
Late Summer / Early Fall (August–September)
- Highest priority window
- After honey harvest, before winter preparation
- Allows time to raise healthy winter bees
The goal of late-season treatment is not immediate colony strength, but the production of healthy winter bees. Elevated mite levels during this period shorten winter bee lifespan and are a leading cause of overwintering failure.
Early Spring (March–April)
- Secondary priority
- Before rapid brood expansion
- Sets the colony up for the season
Treatment Methods Compatible with Primal Bee Hives
Always follow label directions. The information below explains compatibility, not a substitute for product instructions.
Formic Acid Treatments (Mite Away Quick Strips — MAQS)
Why MAQS works well in Primal Bee hives:
- Penetrates capped brood (kills reproducing mites)
- Approved for use with supers on
- Leaves no wax residues
- Performs consistently in stable thermal environments
Application Guidelines
- Remove entrance reducers during treatment
- Place strips on top of frames as directed
- Leave in place for the specified duration (commonly 7 days)
- Remove and dispose of strips properly
What you may notice: increased mite drop and some agitation during treatment is normal.
Best Conditions
- Temperatures between 50–85°F
- Good airflow (do not restrict entrances)
- Avoid extreme weather during treatment
Thymol Treatments (Apiguard)
How It Works
- Thymol is an essential oil that affects mites on adult bees
- Slow-release gel distributed by worker bees
- Does not kill mites under capped brood
Application in Primal Bee Hives
- Place gel tray on top of nest frames
- Ensure bees can access gel surface
- Replace with a second tray after two weeks
- Total treatment duration: ~4 weeks
Best Timing
- Late summer or early fall
- Stable temperatures
- Not during honey flows
Oxalic Acid Treatments (Broodless Periods Only)
When to Use
- Only when colonies are broodless (late fall or winter)
- Highly effective when mites are exposed on adult bees
Important Safety Notes
- Requires proper respiratory protection
- Follow all label and legal requirements
- Some regions restrict application to licensed applicators
Treatment Safety and Precautions
Protecting Your Bees
- Never combine treatments
- Use only one treatment at a time
- Wait at least 6 weeks between different treatments
- Monitor daily for excessive mortality or queen issues
- Remove treatment immediately if severe stress is observed
Protecting Yourself
- Read and follow all product labels
- Wear recommended protective equipment
- Never exceed labeled dosages
- Store treatments securely
Natural and Mechanical Mite Management
Drone Comb Removal
- Varroa prefer drone brood for reproduction
- Removing capped drone brood removes reproducing mites
Drone comb removal reduces pressure, but mechanical methods alone are insufficient for varroa control in most regions and should not be relied on as a standalone strategy.
Screened Bottom Board (Primal Bee Advantage)
- Screen allows mites to fall out of the colony
- Reduces reinfestation
- Enables easy monitoring with the varroa tray
- Improves airflow during treatments
Monitoring Treatment Effectiveness
Post-Treatment Monitoring
- Insert a clean varroa tray one week after treatment ends
- Perform a 24-hour mite count
- Compare to pre-treatment numbers
Effective treatments typically reduce mite counts by ~85% or more.
If reduction is inadequate:
- Consider treatment resistance in your area
- Rotate treatment classes rather than repeating the same product
- Consult local beekeepers or extension services
Record Keeping
Track:
- Date and type of treatment
- Pre- and post-treatment mite counts
- Weather during treatment
- Bee mortality or queen issues
- Observed effectiveness
Integrated Pest Management (IPM)
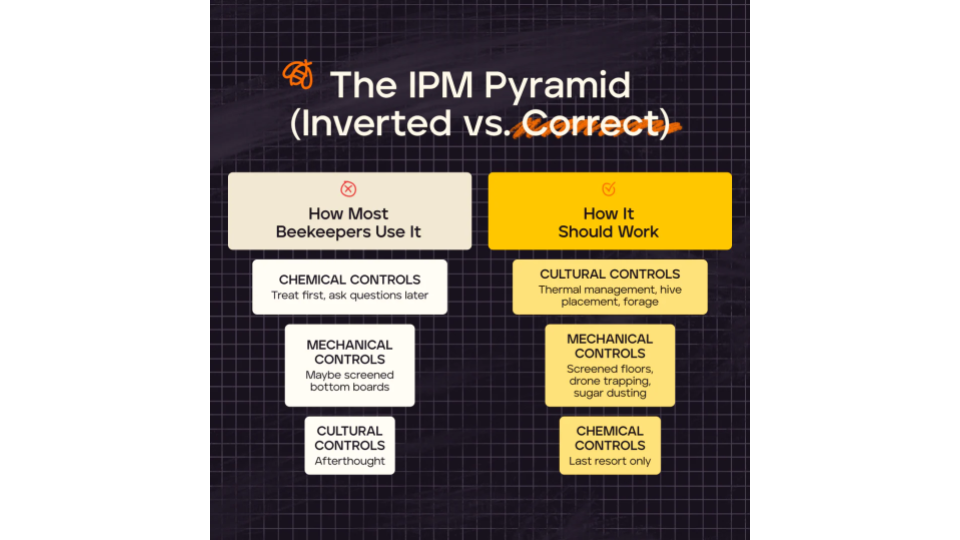
Effective varroa control combines:
- Regular monitoring
- Timely treatment when thresholds are reached
- Screened bottom board use
- Drone comb removal during the season
- Resistant queen genetics when available
Regional Considerations
- Northern climates: Shorter treatment windows; fall treatment is critical
- Southern climates: Year-round brood may require more frequent monitoring
Consult local extension services, beekeeping associations, and experienced regional mentors for area-specific guidance.
The Bottom Line
Varroa management isn’t about perfection. It’s about paying attention, acting before problems compound, and confirming that treatments worked.
Primal Bee hives simplify monitoring and support effective treatments through stable internal conditions. Your role is to stay engaged: watch trends, respond when seasonal thresholds are reached, and verify results.
You don’t need to eliminate varroa to keep strong colonies. You just need to keep pressure low enough for bees to do what they’re designed to do. Monitor consistently, treat thoughtfully, and let the hive’s design handle the rest.
On this Page
- Understanding Varroa Mites
- Using the Primal Bee Varroa Tray for Monitoring
- Treatment Thresholds and Timing
- Treatment Methods Compatible with Primal Bee Hives
- Treatment Safety and Precautions
- Natural and Mechanical Mite Management
- Monitoring Treatment Effectiveness
- Record Keeping
- Integrated Pest Management (IPM)
- Regional Considerations
- The Bottom Line


